
Last updated: November 1, 2026
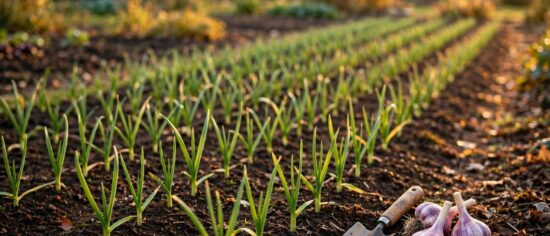
Planting garlic cloves is one of the easiest and most rewarding jobs in the fall garden. You tuck individual cloves into cool autumn soil, let winter do its quiet work, and harvest full bulbs the following summer. But the timing, depth and spacing details are what separate a bumper row of fat bulbs from a bed of disappointing single-clove “rounds.” This guide covers exactly when to plant, how deep to set each clove, how far apart to space them, and how to match the right garlic type to your climate.
Key Takeaways
- Plant garlic cloves in fall, 4–6 weeks before your first hard frost, so roots establish before winter dormancy.
- Set each clove pointed end up, 2–3 inches deep and 4–6 inches apart, with rows 12–18 inches apart.
- Buy seed garlic from a reputable supplier — supermarket garlic often carries growth inhibitors that ruin sprouting.
- Choose hardneck garlic for zones 2–7 and softneck garlic for zones 8–9; zones 9–10 should chill cloves in the refrigerator for 6–8 weeks first.
- Mulch with 3–4 inches of straw or shredded leaves once the soil cools, then harvest the following summer when the lower leaves brown and yellow.
Why Fall Is the Right Time to Plant Garlic Cloves
Garlic is a fall-planted crop. The ideal window is 4–6 weeks before the first hard frost, or roughly before the ground freezes, so each clove has time to grow a strong root system before winter dormancy sets in. That cold period — called vernalization — is what triggers bulb formation in spring. According to the Old Farmer’s Almanac, garlic needs exposure to cold weather to form the segmented bulb gardeners are after.
Plant in spring and you skip vernalization almost entirely. The result is often a single-clove “round” rather than a divided bulb: edible, but not what you planted for. At Activemyhouse, we treat garlic planting day as the official close of the fall garden season — it is one of the last things you plant before winter, and one of the first things you harvest the next summer.
Your exact planting month depends on where you live, so do not let a single date on a seed packet be your only guide:
- Zones 2–3: late September to early October
- Zones 4–5: mid-October to early November
- Zones 6–7: mid-October to late November
- Zones 8–9: November through January
If your first hard frost date is unknown, your local cooperative extension office publishes it — aim for about a month before it.
Hardneck or Softneck: Pick the Right Type for Your Zone
There are two main garlic types, and climate decides which one to grow. Hardneck garlic needs real winter: roughly 40 or more days below 40°F, which makes it the right choice for zones 2–7. It produces fewer, larger cloves. The trade-off is storage — hardneck bulbs keep for about 4–7 months.
Softneck garlic needs far less cold and suits zones 8–9. It stores much longer, roughly 9–12 months according to University of Minnesota Extension guidance, which is why nearly all supermarket garlic is softneck. Gardeners in the warmest areas, zones 9–10, can still grow garlic by giving it an artificial winter: chill the cloves in the refrigerator for 6–8 weeks before planting.
| Feature | Hardneck Garlic | Softneck Garlic | Source |
|---|---|---|---|
| Cold requirement | Needs 40+ days below 40°F (vernalization) | Needs far less cold exposure | Old Farmer’s Almanac |
| Best USDA zones | 2–7 | 8–9 | University of Minnesota Extension |
| Storage life | About 4–7 months | About 9–12 months | Gardener’s Supply Company |
| Warm-zone workaround (zones 9–10) | Not recommended | Chill cloves in fridge 6–8 weeks before planting | Bonnie Plants |
Choose Seed Garlic — Skip the Supermarket
The cloves you plant matter as much as the timing. Do not plant garlic from the grocery store. Supermarket garlic is often treated with growth inhibitors to keep it from sprouting on the shelf, and it may carry diseases or simply be a variety unsuited to your climate. As the Old Farmer’s Almanac advises, garlic from the store is grown for eating, not for planting.
Instead, buy seed garlic from a reputable seed supplier, garden center or local garlic farm. Locally grown seed garlic is already adapted to your region’s conditions. Break the bulbs into individual cloves only a day or two before planting — never weeks ahead — and select the biggest, firmest, unblemished cloves for planting. Keep the papery skin and the basal plate (the flat root end) intact on every clove; damaged cloves rot instead of sprouting. Save the smaller inner cloves for cooking.
How Deep and How Far Apart to Plant Garlic Cloves
This is the part gardeners overthink. The rules are simple:
- Depth: set each clove 2–3 inches deep, measured from the top of the clove to the soil surface. In very cold zones, go up to 3–4 inches deep for extra frost protection — but do not go deeper, or emergence slows and bulbs stay small.
- Spacing: place cloves 4–6 inches apart in the row.
- Rows: space rows 12–18 inches apart so you can weed and water comfortably.
- Orientation: pointed end up, flat basal plate down. A clove planted upside down will still sprout, but it wastes energy turning around and produces a weaker plant.
Press each clove gently into the soil rather than hammering it in, then cover and firm the soil lightly. One common mistake is treating one depth as universal: 2–3 inches is the standard, but gardeners in the coldest zones should use the deeper end of the range, while warm-zone gardeners should stay at the shallower end so cloves do not rot in warm, wet soil.
Soil, Sun and the Best Spot in the Garden
Garlic is not fussy, but it rewards good ground. Give it full sun — at least six hours of direct light daily. The soil should be well-draining and loosened 8–12 inches deep, enriched with compost before planting. Garlic hates sitting in water, so heavy clay beds should be amended generously or planted in raised beds.
Aim for a soil pH between 6.0 and 7.0, and plant when the soil temperature is around 50°F at 4 inches deep. One rule experienced growers take seriously: do not plant garlic where onions, garlic or other alliums grew in the past three years. Alliums share soil-borne diseases, and rotation is the simplest defense. Mark the bed, because you will not want alliums there again until three seasons have passed.
Mulch Once the Soil Cools
After planting, do not mulch immediately in warm weather — wait until the soil has cooled. Then cover the bed with 3–4 inches of straw or shredded leaves. In very cold zones, 6–8 inches of mulch is appropriate. Mulch does three jobs: it insulates against freeze-thaw cycles that can heave cloves out of the ground, it suppresses winter weeds, and it holds spring moisture. Pull the mulch back in early spring as green shoots emerge so sunlight reaches the young leaves.
Spring Feeding and the Summer Harvest
When growth resumes in spring, garlic is a hungry plant. Feed with a nitrogen-rich fertilizer in early spring — blood meal, composted manure or a balanced organic fertilizer all work. Then stop feeding once bulbs begin to form, because late nitrogen encourages leafy tops at the expense of the bulb.
Patience does the rest. Harvest comes 7–9 months after planting, the following summer, when the lower leaves brown and yellow while a few upper leaves are still green. Do not wait until every leaf is dead — overripe bulbs split open in the ground and store poorly. Dig carefully with a fork rather than pulling, brush off the soil, and cure the bulbs for 2–3 weeks in a warm, dry, well-ventilated spot out of direct sun. Properly cured garlic stores for months, depending on the type you grew.
Frequently Asked Questions
Can I plant garlic cloves in the spring?
You can, but expect modest results. Spring planting skips the vernalization period that triggers bulb division, so you will often harvest single-clove “rounds” instead of segmented bulbs. If you missed the fall window entirely, spring planting is still worth trying — just set expectations accordingly and plan to plant properly in fall.
Can I plant garlic from the grocery store?
It is not recommended. Supermarket garlic is frequently treated with sprout inhibitors, may carry disease, and is usually a softneck variety unsuited to cold climates. Certified seed garlic from a reputable supplier costs little more and performs dramatically better.
What happens if I plant garlic cloves too deep or too shallow?
Too deep and the shoot struggles to reach the surface, producing a small, weak plant. Too shallow and freeze-thaw cycles can heave the clove right out of the soil. The 2–3 inch range (up to 3–4 inches in the coldest zones) is the tested sweet spot — deep enough to anchor, shallow enough to emerge.
How do I know when my garlic is ready to harvest?
Watch the leaves, not the calendar. When the lower leaves have browned and yellowed but several upper leaves are still green — typically 7–9 months after fall planting — it is time to dig. If you are unsure, carefully unearth one bulb as a test: the wrapper should be intact and the cloves well formed.
Conclusion
Planting garlic cloves asks little and gives a lot: a fall afternoon of work, a winter of waiting, and a summer harvest of bulbs that taste nothing like the bland heads from the store. Get the three fundamentals right — plant 4–6 weeks before your first hard frost, set each clove pointed end up at the right depth and spacing, and start with quality seed garlic — and the cold will handle the rest. Whether this is your first bed or your tenth, planting garlic cloves remains one of the most satisfying rituals in the home garden.